
Recent Activity
Saturday, April 6 2019
- 6:29pm[IT Services] Email for Staff Cameron Grant updated Email for Staff Cameron Grant updated Email for Staff
- 6:28pm[IT Services] Email for Staff Cameron Grant updated Email for Staff Cameron Grant updated Email for Staff
- 6:26pm[IT Services] Email for Staff Cameron Grant updated Email for Staff Cameron Grant updated Email for Staff
- 6:25pm[IT Services] Email for Staff Cameron Grant updated Email for Staff Cameron Grant updated Email for Staff
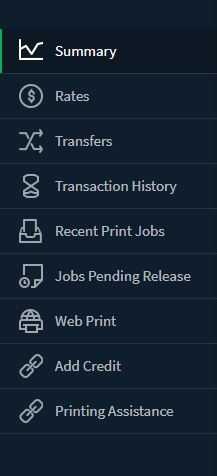
- 6:02pm[IT Services] Adding Printer Credit using PaperCut Cameron Grant updated Adding Printer Credit using PaperCut Changes to Body *//* *//* + 3. From the menu on the PaperCut homepage, click *Add Credit*. 3. From the menu on the PaperCut homepage, click *Add Credit*. + 4. Select the amount you wish to add (£2, £5, £10 or £20) and click *Add value*. 4. Select the amount you wish to add (£2, £5, £10 or £20) and click *Add value*. Cameron Grant updated Adding Printer Credit using PaperCut in Printer Credit and Refunds
- 5:59pm[IT Services] Adding Printer Credit using PaperCut Cameron Grant created Adding Printer Credit using PaperCut This guide will show you how to add credit to your PaperCut account online via a web browser. 1. Access PaperCut (available on campus only) through a web browser by clicking here. 2. Enter your University of Suffolk username (your student number) and password and press Log in.
 3. From the menu on the PaperCut homepage, click Add Credit.
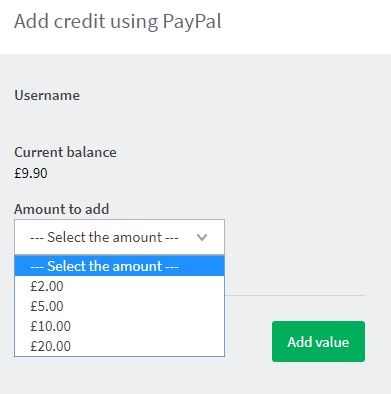
 4. Select the amount you wish to add (£2, £5, £10 or £20) and click Add value.
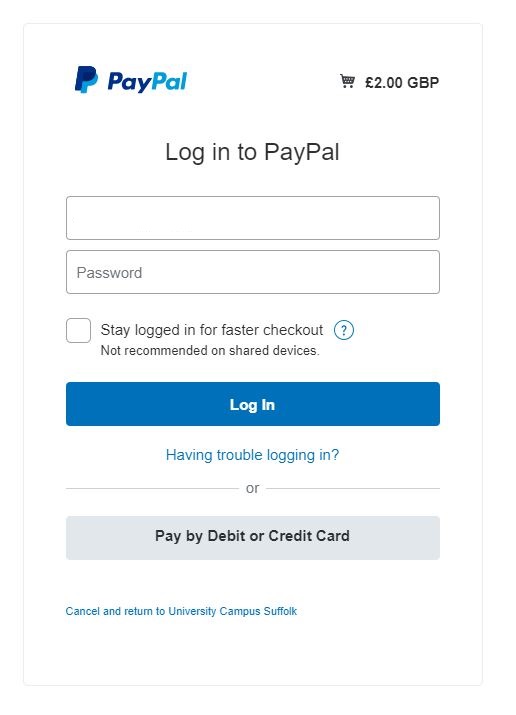
 5. You'll be re-directed to a PayPal gateway. If you have a PayPal account, enter the details at the login prompt. Otherwise, choose 'Pay by Debit or Credit Card'.
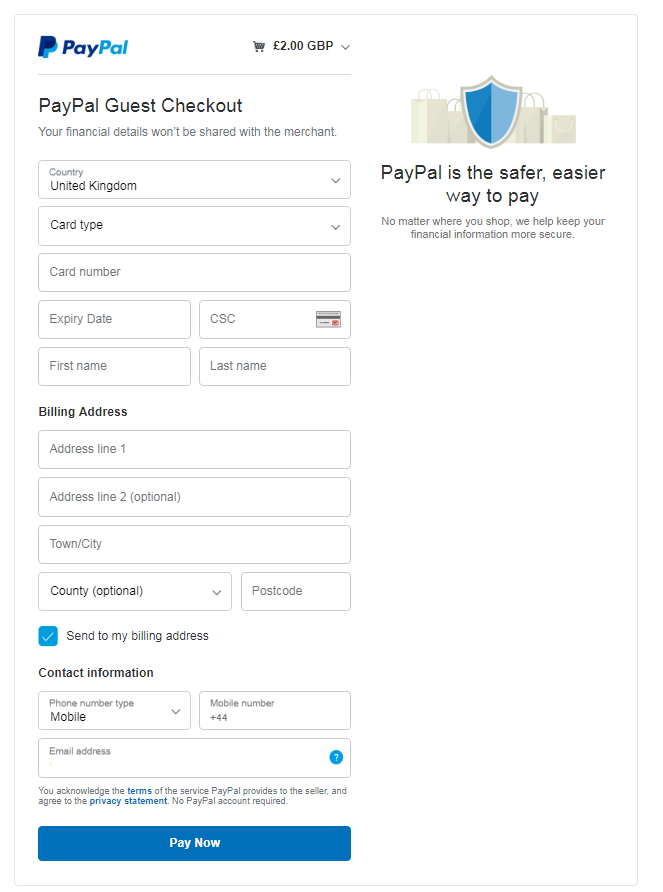
 6. Confirm your card details and billing address if required, then click Pay Now.
 That's it! Your credit should show on your print account within a few moments. If the credit has not been added to your account within 12 hours, please contact the IT Service Desk.
Cameron Grant created Adding Printer Credit using PaperCut in Printer Credit and Refunds
That's it! Your credit should show on your print account within a few moments. If the credit has not been added to your account within 12 hours, please contact the IT Service Desk.
Cameron Grant created Adding Printer Credit using PaperCut in Printer Credit and Refunds - 5:36pm[IT Services] Requesting a refund for printing Cameron Grant updated Requesting a refund for printing Too many differences to list. See Revisions for details.Cameron Grant updated Requesting a refund for printing in Printer Credit and Refunds
- 5:36pm[IT Services] Requesting a refund for printing Cameron Grant updated Requesting a refund for printing Changes to Body This guide will show you how to request a refund for any printing, scanning or copying jobs that have failed or been damaged due to an MFD malfunction. This guide will show you how to request a refund for any printing, scanning or copying jobs that have failed or been damaged due to an MFD malfunction. -1. Access PaperCut through a web browser by clicking here.+1. Access PaperCut through a web browser (available on campus only) by clicking here [1]. 2. Enter your University of Suffolk username (your student number) and password and press *Log in/./* 2. Enter your University of Suffolk username (your student number) and password and press *Log in/./* +*//* 3. From the menu on the PaperCut homepage, click *Recent Print Jobs*. 3. From the menu on the PaperCut homepage, click *Recent Print Jobs*. 4. Locate the print job that failed, or was damaged and click *Request Refund*. 4. Locate the print job that failed, or was damaged and click *Request Refund*. The IT Service Desk will review the refund request. If you have any evidence to support the request (such as the damaged print job), please retain this until the request has been processed. We may ask you to visit the IT Service Desk (located in the Infozone, Waterfront Building) to help us identify what went wrong. The IT Service Desk will review the refund request. If you have any evidence to support the request (such as the damaged print job), please retain this until the request has been processed. We may ask you to visit the IT Service Desk (located in the Infozone, Waterfront Building) to help us identify what went wrong. +[1] http://papercut.uos.ac.uk Cameron Grant updated Requesting a refund for printing in Printer Credit and Refunds
- 5:28pm[IT Services] Requesting a refund for printing Cameron Grant created Requesting a refund for printing This guide will show you how to request a refund for any printing, scanning or copying jobs that have failed or been damaged due to an MFD malfunction. 1. Access PaperCut through a web browser (available on campus only) by clicking here. 2. Enter your University of Suffolk username (your student number) and password and press Log in.
3. From the menu on the PaperCut homepage, click Recent Print Jobs.
4. Locate the print job that failed, or was damaged and click Request Refund.
 5. Add information to support your refund request and press Send.
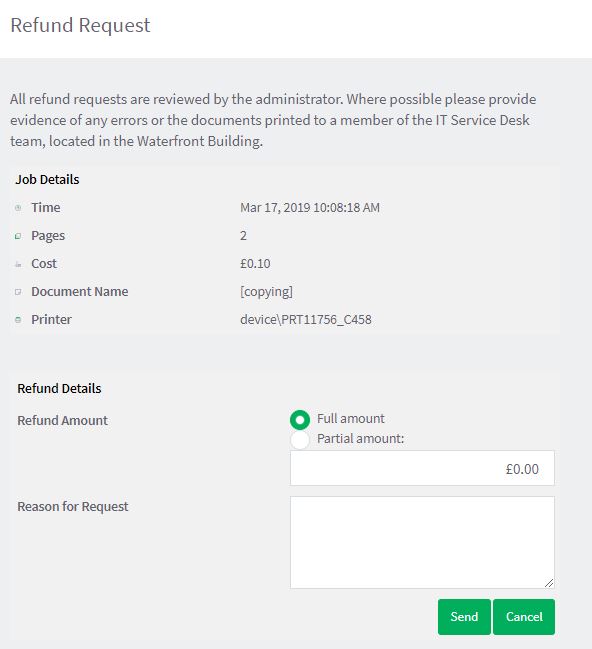 The IT Service Desk will review the refund request. If you have any evidence to support the request (such as the damaged print job), please retain this until the request has been processed. We may ask you to visit the IT Service Desk (located in the Infozone, Waterfront Building) to help us identify what went wrong.
Cameron Grant created Requesting a refund for printing in Printer Credit and Refunds
The IT Service Desk will review the refund request. If you have any evidence to support the request (such as the damaged print job), please retain this until the request has been processed. We may ask you to visit the IT Service Desk (located in the Infozone, Waterfront Building) to help us identify what went wrong.
Cameron Grant created Requesting a refund for printing in Printer Credit and Refunds - 5:04pm[IT Services] Email for Students Cameron Grant updated Email for Students Cameron Grant updated Email for Students
- 5:01pm[IT Services] Email on macOS Cameron Grant created Email on macOS The guides on this page will show you how to add your University of Suffolk email account to your Mac device, using the Mail app. Cameron Grant created Email on macOS
- 5:00pm[IT Services] Email on a web browser Cameron Grant created Email on a web browser You can access your Office 365 email and calendar online by clicking here or typing outlook.com/uos.ac.uk in to the web browser address bar. When you access Office 365 online, you'll be prompted for your University of Suffolk username and password. Your username is your student number followed by @uos.ac.uk (for example, s123456@uos.ac.uk). Your password is the same one you use for other University systems such as MySuffolk. If your student account was created before August 2016, you may need to enter the suffix @ucs.ac.uk after your student number when logging in to Office 365. Here's how the login prompt will appear:
 The first time you log in to Office 365, you'll be prompted to set the language and time zone. Please make sure the time zone is set to (UTC+00:00) Dublin, Edinburgh, Lisbon, London as below:
 This ensures your academic timetable shows correctly in your Office 365 calendar.
Cameron Grant created Email on a web browser
This ensures your academic timetable shows correctly in your Office 365 calendar.
Cameron Grant created Email on a web browser - 4:59pm[IT Services] Email on Windows Cameron Grant created Email on Windows The guides on this page will show you how to add your University of Suffolk email account to your Windows device, using the Outlook and Mail apps. Cameron Grant created Email on Windows
- 4:48pm[IT Services] Register Your ID Card with the printers Cameron Grant updated Register Your ID Card with the printers Changes to Body -2. A message on the touch screen will indicate the card is unknown and ask if you want to associate it. Press *Yes*. +2. A message on the screen will indicate the card is unknown and ask if you want to associate it. Press *Yes*. Cameron Grant updated Register Your ID Card with the printers
- 4:47pm[IT Services] Register Your ID Card with the printers Cameron Grant updated Register Your ID Card with the printers Changes to Body This guide will show you how to associate your ID Card with PaperCut, the print system used at the University of Suffolk. You can complete this process using any of the Konica Minolta MFD devices located across the campus. This guide will show you how to associate your ID Card with PaperCut, the print system used at the University of Suffolk. You can complete this process using any of the Konica Minolta MFD devices located across the campus. + 1. Present your ID Card to the reader on the MFD device, indicated by a card icon as shown below: 1. Present your ID Card to the reader on the MFD device, indicated by a card icon as shown below: Cameron Grant updated Register Your ID Card with the printers
- 4:47pm[IT Services] Register Your ID Card with the printers Cameron Grant updated Register Your ID Card with the printers Changes to Body -This guide will show you how to associate your ID Card with Papercut, the print system used at the University of Suffolk. You can complete this process using any of the Konica Minolta MFD devices located across the campus. +This guide will show you how to associate your ID Card with PaperCut, the print system used at the University of Suffolk. You can complete this process using any of the Konica Minolta MFD devices located across the campus. 1. Present your ID Card to the reader on the MFD device, indicated by a card icon as shown below: 1. Present your ID Card to the reader on the MFD device, indicated by a card icon as shown below: Cameron Grant updated Register Your ID Card with the printers
- 4:47pm[IT Services] Register Your ID Card with the printers Cameron Grant updated Register Your ID Card with the printers Changes to Body -If you present your ID Card to the reader on the MFD, you'll be logged in automatically without needing to enter your username and password. +From now on, when you present your ID Card to the reader on the MFD, you'll be logged in automatically without needing to enter your username and password. Cameron Grant updated Register Your ID Card with the printers
- 4:46pm[IT Services] Register Your ID Card with the printers Cameron Grant updated Register Your ID Card with the printers Changes to Body -This guide will show you how to associate your ID Card with Papercut, the print system used at the University of Suffolk. This will save You can complete this process using any of the Konica Minolta MFD devices located across the campus. +This guide will show you how to associate your ID Card with Papercut, the print system used at the University of Suffolk. You can complete this process using any of the Konica Minolta MFD devices located across the campus. 1. Present your ID Card to the reader on the MFD device, indicated by a card icon as shown below: 1. Present your ID Card to the reader on the MFD device, indicated by a card icon as shown below: Cameron Grant updated Register Your ID Card with the printers
- 4:46pm[IT Services] Register Your ID Card with the printers Cameron Grant updated Register Your ID Card with the printers Changes to Body This guide will show you how to associate your ID Card with Papercut, the print system used at the University of Suffolk. This will save You can complete this process using any of the Konica Minolta MFD devices located across the campus. This guide will show you how to associate your ID Card with Papercut, the print system used at the University of Suffolk. This will save You can complete this process using any of the Konica Minolta MFD devices located across the campus. 1. Present your ID Card to the reader on the MFD device, indicated by a card icon as shown below: 1. Present your ID Card to the reader on the MFD device, indicated by a card icon as shown below: + + 2. A message on the touch screen will indicate the card is unknown and ask if you want to associate it. Press *Yes*. 2. A message on the touch screen will indicate the card is unknown and ask if you want to associate it. Press *Yes*. + 3. Enter your University of Suffolk username (your student or staff number) and your password. Press *Set*. 3. Enter your University of Suffolk username (your student or staff number) and your password. Press *Set*. + + 4. You'll receive confirmation that the ID Card has been registered successfully. Press *OK*. 4. You'll receive confirmation that the ID Card has been registered successfully. Press *OK*. -If you present your ID Card to the reader on the MFD, you'll be logged in automatically without needing to enter your username and password. +If you present your ID Card to the reader on the MFD, you'll be logged in automatically without needing to enter your username and password. Cameron Grant updated Register Your ID Card with the printers
- 4:44pm[IT Services] Register Your ID Card with the printers Cameron Grant updated Register Your ID Card with the printers Too many differences to list. See Revisions for details.Cameron Grant updated Register Your ID Card with the printers